
Curriculum[edit]
 |
Coder Merlin™ Computer Science Curriculum Data |
|
Unit: Lab basics Experience Name: GitHub (W1007.10) Next Experience: () Knowledge and skills:
Topic areas: Source control systems Classroom time (average): 60 minutes Study time (average): 180 minutes Successful completion requires knowledge: understand the purpose of a source control system when working with multiple users Successful completion requires skills: ability to push and pull changes to/from the source control system; ability to use a source control system to merge changes; ability to properly handle merge conflicts |

Introduction[edit]
Although using git locally is a wonderful way to track our revisions and enables us to rollback to previous versions, to take full advantage of git we'll use GitHub. GitHub is a service where we can replicate (copy) our repository and collaborate with others.
A GitHub Account[edit]
Your guide will set up a repository for your use for this assignment. Be sure to follow the instructions carefully. To participate, you'll need a GitHub account. GitHub accounts are free to create.
- Go to https://github.com
- At the top, right-hand side of the page, click the
 button.
 - On the next page, called Set up your account, fill in this short form:
- Create a unique (and appropriate) username.
- Provide an accessible email address, as directed by your guide.
- Provide a password.
- You might receive a small puzzle to solve; if so, solve the puzzle.
- Click the Create Account button.

- On the next page, you might have to fill in a brief survey. At the bottom, click the Complete Setup button.

- You'll receive an email to the address you specified.
- Check your email client and find the email from GitHub.
- Click the
 button.
Configuration[edit]
To squelch the warning that occurs while pushing, execute the following:
jane-williams@codermerlin:~$ git config --global push.default matching
Note: This command, if successful, completes silently.
Token Allocation[edit]
Tokens are a safer alternative to passwords. They have these characteristics:
- Unique to a service and therefore can't be reused on another
- Revocable individually without adversely affecting other credentials
- Limited to authorization for a specific use case without the need for broader access
- Random and thus not subject to dictionary attacks
To allocate your token for Coder Merlin™ on GitHub, carefully follow these instructions:
Generate a New SSH Key[edit]
jane-williams@codermerlin:~$ ssh-keygen -t ed25519 -C "jane-williams@codermerlin.com"
Be sure to replace the above email address with your actual email address used for GitHub.
You'll then be presented with a series of prompts. Unless otherwise instructed by your guide, press Return for each to accept the default.
Generating public/private ed25519 key pair.
Enter file in which to save the key (/home/jane-williams/.ssh/id_ed25519): Return
Enter passphrase (empty for no passphrase): Return
Enter same passphrase again: Return
Your identification has been saved in /home/jane-williams/.ssh/id_ed25519
Your public key has been saved in /home/jane-williams/.ssh/id_ed25519.pub
The key fingerprint is:
SHA256:t0kJmRZa4ImzPbO88e2Onkbuwbews73rzjSB5zifU9o john-williams@codermerlin.com
The key's randomart image is:
+--[ED25519 256]--+
+----[SHA256]-----+
Add the Key to GitHub[edit]
jane-williams@codermerlin:~$ cat ~/.ssh/id_ed25519.pub
Copy the contents of the file to your clipboard. Then do the following:
- Go to GitHub.com
- In the upper-right corner of any page, click your profile photo, then click Settings.
- In the "Access" section of the sidebar, click SSH and GPG keys.
- Click New SSH key or Add SSH key.
- In the Title field, add a descriptive label for the new key.
- Paste your key into the Key field.
- Click Add SSH key.
Test your Key[edit]
jane-williams@codermerlin:~$ ssh -T git@github.com
If successful, you should see something like below:
> Hi username! You've successfully authenticated, but GitHub does not
> provide shell access.
Assignments[edit]
Your guide will create a GitHub assignment for you. You'll receive an email with an invitation link.
- BEFORE clicking the link, sign in to GitHub using the correct account.
- Click the link.
 Helpful Hint
Your guide will create assignments for you that are Private; that is, they'll be visible only to you (or your group for group assignments) and your guide. If you create any repositories on your own, be sure you select the correct setting.
Joining the Classroom Roster[edit]
The first time you click an assignment, you'll be asked to join the classroom roster. You'll see a message like, "Join the classroom roster: Your teacher has configured this classroom to pair GitHub accounts with identifiers."
- Click your identifier. (Do NOT skip this step.)
- The next page presents you with an
 . Click the Accept this assignment button.
 - You might see a progress bar (or two). Be patient as your assignment is prepared. When the assignment is ready, you'll see the message: "You are ready to go!"
- A link should be ready at the very bottom of the page, immediately after the text "Your assignment has been created here:" Click that link. You'll need this link in a subsequent step in this experience.
Helpful Hint
First GitHub Assignment[edit]
Your first GitHub assignment will be to sync all of your journals with GitHub. To do so, you'll need to specify a GitHub URL as your "remote" for your existing git repository.
Enter your Journals directory:
john-williams@codermerlin:~$ cd ~/Journals
Remember that you've already added all these files to your local git repository. You can easily verify this by checking the status.
john-williams@codermerlin:~/Digital Portfolio/CS-I/Journals$ git status
You should see something like below:
On branch master
nothing to commit, working tree clean
Let's add the remote. To do so, we'll need the URL from the above assignment. It will be something similar to:
https://github.com/.../2024-journals-JohnWilliams
Be sure to use your own url, which is unique to you.
john-williams@codermerlin:~/Journals$ git remote add origin https://github.com/.../2020-journals-JohnWilliams.git
Then, we can push our local commits to the remote server:
john-williams@codermerlin:~/Journals$ git push -u origin master
You'll then be promoted to enter your username and password. Remember to use your GitHub username and token. After the push is completed, go back to the browser and refresh the page.
Workflow Overview[edit]
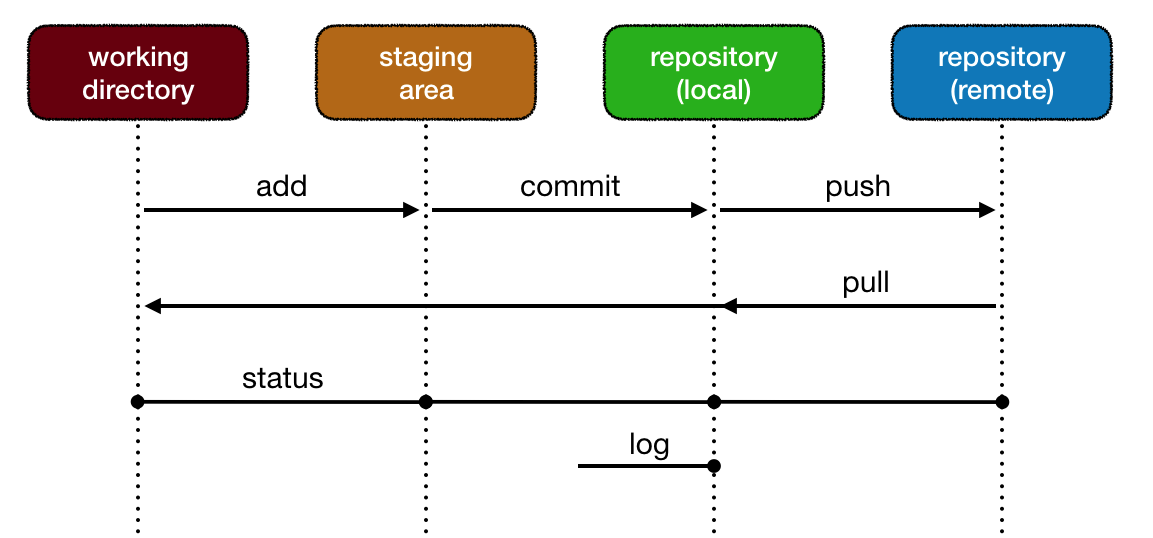
The workflow when using a remote repository is very similar to that using only a local repository, with the exception of push and pull.
addthe files to the staging areacommitthe files to the repositorypushthe local repository to the remote
The most significant difference is that we'll need to keep in mind that others might also be working on the remote repository, so we'll need to sync their remote changes with our local repository. The best practice is to perform a pull before beginning work in the working directory.
Tagging[edit]
As you progress through your work, whether it be code or prose, you'll accumulate more and more commits, each with its own version of a file. There will be times when you'll need to mark a specific commit. For example, you might want that commit to be reviewed by your editor or by quality assurance personnel. Git is able to mark specific points in the repository as being important. This process is called tagging, and the mark itself is called a tag. It's important to note that the entire repository at a given point in time is tagged, not one file or group of files.
Tagging Locally[edit]
A tag can be placed on the repository with the following command, replacing tagName with the actual name of the tag.
john-williams@codermerlin:~$ git tag tagName
For example:
john-williams@codermerlin:~$ git tag E1399.Outline
Pushing a Specific Tag to a Remote[edit]
To push a tag to a remote repository, use the following command:
john-williams@codermerlin:~$ git push origin tagName
For example:
john-williams@codermerlin:~$ git push origin E1399.Outline

Pushing a tag includes all required objects for that tag, but does NOT include any other references. For example, it does not include your commits. Therefore, it is vital that you first push your commits by executing the following:
john-williams@codermerlin:~$ git push
and then push any desired tags.
Deleting a Tag Locally[edit]
You can delete a tag locally by using the following command, replacing tagName with the actual name of the tag.
john-williams@codermerlin:~$ git tag --delete tagName
Deleting a Tag from a Remote[edit]
You can delete a tag from a remote with the following command, replacing tagName with the actual name of the tag.
john-williams@codermerlin:~$ git push --delete origin tagName
Best Practices[edit]
 |
Coming Soon |
|
Key Concepts[edit]

- GitHub is a service where we can replicate (copy) our repository and collaborate with others.
- GitHub serves as a remote repository.
- The workflow when using a remote repository is very similar to that using only a local repository except that additional commands are required.
- push pushes the files from the local repository to the remote repository.
- pull pulls the files from the remote repository to the local repository (and working directory).
- tag marks a specific commit as 'special'.
- push origin <tag> pushes the specified tag from the local repository to the remote repository.
Exercises[edit]
- Push all of the journals in the Journals directory to GitHub and be sure to continue to push all new/modified journals as well. Note that this applies to essays and excursions as well.
- Journals and essays should be stored in your "Journals" directory and pushed to your "Journals" repository.
- Exercises and excursions should be stored in your "Experiences" directory and pushed to your "Experiences" repository.
- Your final version of any exercise must be tagged as <ExerciseName>.Final. For example, for J1006, the file will be named J1006.txt (because it is a text file) and the final version should be tagged J1006.Final
References[edit]
- Git (Wikipedia)
- Tagging (Git Documentation)
Experience Metadata
| Experience ID | W1007.10 |
|---|---|
| Next experience ID | |
| Unit | Lab basics |
| Knowledge and skills | §10.231 §10.232 |
| Topic areas | Source control systems |
| Classroom time | 60 minutes |
| Study time | 3 hours180 minutes <br /> |
| Acquired knowledge | understand the purpose of a source control system when working with multiple users |
| Acquired skill | ability to push and pull changes to/from the source control system ability to use a source control system to merge changes ability to properly handle merge conflicts |
| Additional categories |