
Source Control

Curriculum[edit]
 |
Coder Merlin™ Computer Science Curriculum Data |
|
Unit: Lab basics Experience Name: Source Control (W1006) Next Experience: () Knowledge and skills:
Topic areas: Source control systems Classroom time (average): 60 minutes Study time (average): 30 minutes Successful completion requires knowledge: understand the purpose of a source control system Successful completion requires skills: ability to use a source control system to add, delete, and move documents; ability to use a source control system to commit changes; ability to use a source control system to checkout previous versions; ability to view a log of changes |
Background[edit]
- Read Version Control (Wikipedia)
- Read Git Basics (Git)
Introduction[edit]
Source control enables us to track and manage changes to our code. This functionality becomes increasingly critical as the size of our projects grow both in terms of the lines of code and the number of coders. Source control shows us who changed the code and when. We're able to compare one revision of code to another. And, when necessary, we can roll back changes to a previous revision. Source control can be a tremendous help to you (and your team) when you want to easily recover from accidentally damaging a project and, as such, provides you with the freedom to experiment without fear. However, you must use the source control system regularly and often or it won't be helpful to you. In this experience, we'll configure our source control system, learn (a bit) about how to use it, and then place our journals under source control.
Git[edit]
Many options are available to choose from when selecting a source control system. We'll be using one called Git, created by Linus Torvalds in 2005. It's a distributed version-control system, meaning that every Git directory on every computer is a repository with a complete history and full version-tracking abilities.
Let's say you're a graphic artist specializing in photo restoration and working for the director of a museum. You've received an old photo that you're responsible to restore. Every step requires a lot of work and, being human, sometimes you make a mistake. Even if you didn't make a mistake, your director might not agree with the choices that you've made. You (smartly) decide that just like every other project you've done, you'll track every version of your file in Git.
Let's consider your progress through this process:
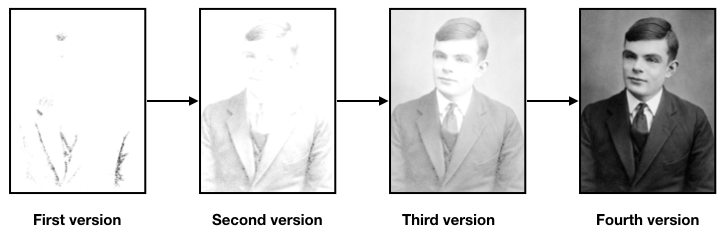
You commit each version of your project into Git. Git considers each commit to be a snapshot of the current project. Each snapshot includes every current version of every file in your project that you've added to Git, so it becomes a simple matter to move back in time to any version. While you're able to attach comments to each commit, internally, Git uses a something called an SHA-1 hash to uniquely identify each commit. The hash is a 40-character string generated from the content of the files and directory structure. The hash looks something like this: 24b9da6552252987aa493b52f8696cd6d3b00373. You'll see this type of string in the Git log.
 Helpful Hint
Git enables you to experiment fearlessly because (as long as you've been diligent with your commits) you can also go back to a previous (working) version.
Configuration[edit]
As a first step, we'll need to let Git know about our name and email address. Be sure to change your name and email address appropriately. To complete the setup process, you'll need to be able to receive email at the address you specify.
jane-williams@codermerlin:~$ git config --global user.email "jane@williams.org"
jane-williams@codermerlin:~$ git config --global user.name "Jane Williams"
Note: These commands, if successful, will complete silently.
Initialization[edit]
Let's setup a new directory for all of our experiences and within that, a directory for this experience:
jane-williams@codermerlin:~$ mkdir Experiences
jane-williams@codermerlin:~$ cd Experiences
jane-williams@codermerlin:~/Experiences$ mkdir W1006
jane-williams@codermerlin:~/Experiences$ cd W1006
jane-williams@codermerlin:~/Experiences/W1006$
One can consider the structure of a project, consisting of directories, files, and the associated content, as two dimensional. The repository can then be considered a three-dimensional structure formed by storing every committed version of the project structure across time. To initialize the repository, we issue the init command in the root of our project:
jane-williams@codermerlin:~/Experiences/W1006$ git init
Initialized empty Git repository in /home/jane-williams/Experiences/W1006/.git/
Note that this repository exists locally, alongside your other files for the project. There is no central server repository.
Helpful Hint
Add a File and Check Status[edit]
Let's create a small file that we can add to our project:
jane-williams@codermerlin:~/Experiences/W1006$ echo "This file isn't empty." > file1.txt
Let's find out what Git knows about this file:
jane-williams@codermerlin:~/Experiences/W1006$ git status
...
Untracked files:
(use "git add <file>..." to include in what will be committed)
file1.txt
...
Note that "file1.txt" is displayed in red under the title "Untracked files." Git is telling us that this file isn't being tracked. If we want to track it, we'll need to tell Git to do so:
jane-williams@codermerlin:~/Experiences/W1006$ git add file1.txt
Let's check the status now:
jane-williams@codermerlin:~/Experiences/W1006$ git status
...
Changes to be committed:
(use "git rm --cached <file>..." to unstage)
new file: file1.txt
...
Note that "file1.txt" is displayed in green under the title "Changes to be committed." Git is telling us that this file will be included in the next commit.

A Git repository contains a set of commit objects, where each commit object in itself contains:
- The set of files representing a project at the instant of a commit
- References to parent commit objects
- A string of characters that uniquely identifies that commit object
The very first commit won't have any parents.
Each Git repository is essentially a directed graph of commit objects.
The previous status output mentioned a command to be used to unstage. What's a stage?
Git States[edit]
A file in your project could be in one of three states:
- Modified - a tracked file has been modified but hasn't yet been staged
- Staged - the current version of the file's data has been marked for inclusion in the next commit snapshot
- Committed - the file's data has been safely stored in the repository
Consequently, a Git project has three main sections:
- Working directory - These are the files of your project that you interact (work) with
- Staging area - a list of objects (directories and files) that will go into the next commit
- Repository - this is where Git stores all the information, i.e., metadata (data that describes other data) and objects (directories and files) associated with your project

Committing Changes[edit]
To create a new snapshot of all staged objects, we use the commit command. As part of the commit, it's helpful to explain (both to our fellow programmers and to our future selves) what it is that we changed and why. To facilitate this, Git opens emacs so that we can edit our commit comments.
jane-williams@codermerlin:~/Experiences/W1006$ git commit
Emacs now opens. We'll see something similar to:
1 |
2 | # Please enter the commit message for your changes. Lines starting
3 | # with '#' will be ignored, and an empty message aborts the commit.
4 | #
5 | # On branch master
6 | #
7 | # Initial commit
8 | #
9 | # Changes to be committed:
10 | # new file: file1.txt
11 | #
Let's add a helpful comment:
1 |Adding our first file in this tutorial
2 | # Please enter the commit message for your changes. Lines starting
We then save the file and exit emacs as usual: CONTROL-x CONTROL-s CONTROL-x CONTROL-c

Meaningful commit comments are very important and likely required by your guide. Some excellent descriptions of such messages are below:
- How to Write a Git Commit Message (Chris Beams)
- Useful Commit Messages (Jacob Herrington)
Git then lets us know that the commit was successful with a message similar to the following:
[master (root-commit) 3fe8239] Adding our first file in this tutorial
1 file changed, 1 insertion(+)
create mode 100644 file1.txt

Execute the command git log:
jane-williams@codermerlin:~/Experiences/W1006$ git log
- What is Git communicating to you?
- What do you see that is common between this git log command and the previous git commit?
- Why do you think this is?
More Changes[edit]
Let's add some additional text to file1.txt and create a new file, file2.txt. Use emacs to do the following:
- Add a new line to the end of "file1.txt" with the text, "This is a new line."
jane-williams@codermerlin:~/Experiences/W1006$ emacs file1.txt
- Add a new file, "file2.txt" with the text, "This is a new line in a new file."
jane-williams@codermerlin:~/Experiences/W1006$ emacs file2.txt
Then, exit emacs and take a look at the status provided by Git.
jane-williams@codermerlin:~/Experiences/W1006$ git status
- What do you notice about file1.txt and file2.txt? How are they displayed in git status?
- Are they both displayed in the same section? If not, why not?
Let's stage the new versions of both of these files:
jane-williams@codermerlin:~/Experiences/W1006$ git add file1.txt file2.txt
Then, have a look at the status again:
jane-williams@codermerlin:~/Experiences/W1006$ git status
- What do you notice about file1.txt and file2.txt? How are they displayed in git status?
- Compare and contrast the manner in which the two files are displayed.
Before we commit our changes, let's remind ourselves of what's changed. We can compare our working directory to the repository with git diff. To compare the staged area to the repository, we add the --cached flag:
jane-williams@codermerlin:~/Experiences/W1006$ git diff --cached
- How many files are listed as having been changed?
- What are the specific differences listed for each file? In what color is the difference displayed?
To conclude this section, let's commit our changes.
jane-williams@codermerlin:~/Experiences/W1006$ git commit
- Execute the commands
jane-williams@codermerlin:~/Experiences/W1006$ git diff
jane-williams@codermerlin:~/Experiences/W1006$ git diff --cached
What does Git tell you has changed? Why?
Create Journal Repository[edit]
We'll create a repository for all of our journals. First, we'll temporarily move to our journal directory:
jane-williams@codermerlin:~/Experiences/W1006$ pushd ~/"Digital Portfolio"/CS-I/Journals
As such, the general workflow is as follows:
- Initialize the repository. This must be done **only once**.
jane-williams@codermerlin:~/Digital Portfolio/CS-I/Journals$ git init
- Create or modify files in your working directory
- Add the files to the staging area
jane-williams@codermerlin:~/Digital Portfolio/CS-I/Journals$ git add J1002.html
- Commit all of the staged changes to the repository
jane-williams@codermerlin:~/Digital Portfolio/CS-I/Journals$ git commit
Now, return from the Journals directory:
jane-williams@codermerlin:~/Digital Portfolio/CS-I/Journals$ popd
Helpful Hint
- To add multiple, named files:
jane-williams@codermerlin:~/Digital Portfolio/CS-I/Journals$ git add J1006.html J1007.html J1008.html
- To add everything that has changed:
jane-williams@codermerlin:~/Digital Portfolio/CS-I/Journals$ git add .
Ignoring Unimportant Files[edit]
Emacs produces some files that are temporary in nature and should be excluded from Git. However, unless we specify which files to ignore, git status will show these temporary files in addition to the files that are important to us. At best, this can be annoying. To instruct Git to ignore these temporary files, create a special file in your git directory named .gitignore (the leading period is significant). For example:
john-williams@codermerlin:~/Digital Portfolio/CS-I/Journals$ emacs .gitignore
To this file, add the following three lines:
*~
\#*\#
.merlin/
The * character is known as a wildcard character and it will match any standard character, instructing Git to ignore files such as story.txt~ and #story.txt#. The .merlin/ line will ignore directories special to the Coder Merlin™ platform.
Save the file and exit emacs. Repeat this process for any new Git repository that you create. Or, better yet, because these files are particular to the editor and platform you are using, move this file to your configuration directory using the following command:
mv .gitignore ~/.config/git/ignore
After executing this command, it will no longer be necessary to create a new .gitignore file to exclude the files and directories listed.
Oopsies... or How to Revert Changes[edit]
 |
Coming Soon |
|
Section on How to Revert Changes |
Key Concepts[edit]

- Source control enables us to track and manage changes to our code.
- Source control shows us who changed the code and when.
- We're able to compare one revision to another.
- We can rollback changes to a previous revision.
- Source control provides the freedom to experiment without fear.
- Git was created by Linus Torvalds in 2005.
- Git is a distributed version-control system; every Git directory on every computer is a repository with a complete history and full version-tracking abilities.
- Git considers each commit to be a snapshot of the current project. Each snapshot includes every current version of every file in the project that's been added to Git.
- A file in a project can be three states:
- Working directory contains the files that have been created or modified in the project
- Staging area contains a list of files that will go into the next commit
- Repository is where Git stores all the committed information
- The general workflow for using Git is as follows:
- init to initialize the repository; we generally only do this once per project
- diff to show us the differences between the working directory and the repository
- diff --cached to show us the differences between the staging area and the repository
- add to add new files or their most recent modifications
- commit to save the snapshot from the staging area into the repository
Exercises[edit]
- J1006 Create a journal and answer all questions. Be sure to include all sections of the journal, properly formatted.
- Enter your Journals directory, then do the following:
- Initialize a Git project in the directory.
- Add all of your journals to Git and commit these changes.
- Going forward, it will be your responsibility to always add every journal to git. This includes any updates to your journals. Also note that all content must be present within the Git repository. Substituting links (e.g., Google Docs) for actual content is not acceptable.
After completing W1008:
- M1006-31 Complete Merlin Mission Manager Mission M1006-31.
References[edit]
Experience Metadata
| Experience ID | W1006 |
|---|---|
| Next experience ID | |
| Unit | Lab basics |
| Knowledge and skills | §10.231 |
| Topic areas | Source control systems |
| Classroom time | 60 minutes |
| Study time | 30 minutes |
| Acquired knowledge | understand the purpose of a source control system |
| Acquired skill | ability to use a source control system to add, delete, and move documents ability to use a source control system to commit changes ability to use a source control system to checkout previous versions ability to view a log of changes |
| Additional categories |